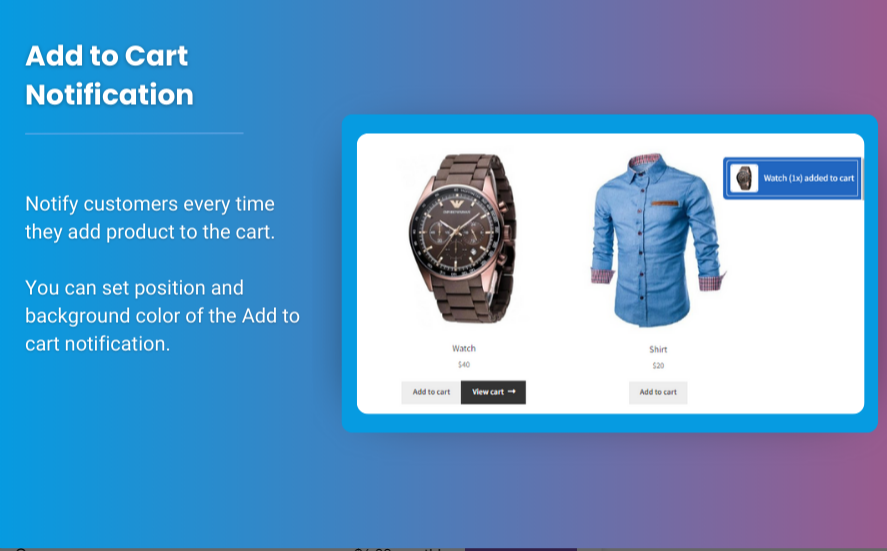
The Mini Cart WooCommerce is a vital component of any WooCommerce store. It provides customers with a quick and convenient way to view their cart without leaving the page they’re on. Customizing this feature can significantly improve the shopping experience and lead to higher conversion rates.
In this ultimate guide, we’ll walk you through how to customize your WooCommerce Mini Cart, including how to implement a WooCommerce sticky cart, and provide tips for enhancing its functionality to suit your store’s needs.
Why Customize the WooCommerce Mini Cart?
Customizing the mini cart WooCommerce provides multiple benefits:
- Improved User Experience: Customers can quickly view and manage their cart without interrupting their shopping flow.
- Higher Conversion Rates: A streamlined and accessible mini cart can encourage more customers to complete their purchase.
- Branding Consistency: Customizing the look and feel of the mini cart to match your store’s design ensures a cohesive shopping experience.
- Convenient Navigation: A WooCommerce sticky cart (one that remains visible as users scroll) keeps the cart accessible at all times, reducing friction in the shopping process.
How to Customize the WooCommerce Mini Cart
Step 1: Enable the WooCommerce Mini Cart
Before you begin customizing, ensure that the mini cart is enabled in your WooCommerce store. Most themes include this functionality out-of-the-box, but you may need to enable it manually if it’s not showing up.
- Go to your WordPress dashboard.
- Navigate to Appearance > Customize.
- Under WooCommerce, look for options related to the cart (usually within the Header or Product Pages section).
- Enable the mini cart if it’s not already active.
If your theme doesn’t support a mini cart or if you need additional features, you can install a plugin like WooCommerce Menu Cart or WooCommerce Side Cart to bring this feature to your store.
Step 2: Add or Modify Cart Icons and Labels
The icon in the header or navigation menu is usually a simple cart symbol, but you can customize this to better fit your theme or make it more engaging for users.
-
Customizing the Icon: You can change the default cart icon by modifying the HTML and CSS in your theme’s header file or by using a plugin that allows you to replace icons. Many WooCommerce-compatible themes will let you upload custom icons directly through the Customizer.
-
Modify Cart Labels: If you want the cart icon to show the total number of items or the price, you can modify the default cart icon label using a plugin like WooCommerce Customizer or by adding custom code.
Example:
This code updates the mini cart label to show the number of items in the cart and the total cost.
Step 3: Customize the Cart Behavior (WooCommerce Sticky Cart)
A sticky cart allows the mini cart to remain visible and accessible as users scroll through the page, providing a seamless shopping experience. This is particularly useful on product pages or long category lists.
To create a sticky cart:
-
Use a Plugin: Many plugins, such as WooCommerce Sticky Cart or WP Sticky, allow you to make the cart sticky without needing to write any code. These plugins give you control over how and where the sticky cart appears, whether it’s at the top or bottom of the page, and how it behaves when the page is scrolled.
-
Custom Code: If you prefer a hands-on approach, you can use custom CSS and JavaScript to make the mini cart sticky.
Here’s an example using CSS:
You can add this code to your theme’s custom CSS section or within a child theme’s style file. Make sure to test the cart behavior to ensure it’s not interfering with other elements on the page.
Step 4: Add Product Information to the Mini Cart
The default mini cart typically shows only the product name and quantity. To make it more informative, you can add additional product details such as product images, price, or product variations.
-
Using a Plugin: Plugins like WooCommerce Customizer or WooCommerce Side Cart can help you quickly add product details to your mini cart.
-
Custom Code: You can also add custom code to display product images, prices, and other details inside the mini cart. Here’s an example of how to display product images in the mini cart:
Step 5: Customize Cart Layout and Design
To improve the visual appeal and functionality of the mini cart, you may want to customize its layout and design. This includes changing colors, fonts, button styles, or even adding animations.
- CSS Customizations: You can use custom CSS to adjust the design. For example, changing the background color of the mini cart to match your theme:
- JavaScript for Animation: Add subtle animations to your mini cart for a smoother user experience. For instance, you can animate the cart opening with a sliding effect using JavaScript or jQuery.
Step 6: Add Cart Summary and Checkout Shortcuts
To enhance the WooCommerce Mini Cart functionality, you can add a quick summary of the cart contents and a shortcut to the checkout page. This helps users make quicker decisions and proceed to checkout with less friction.
- Quick Summary: Show the total cart value, number of items, and a link to view the full cart.
Example:
- Checkout Shortcut: Add a button that takes users directly to the checkout page.
FAQs
Q1: How can I make the WooCommerce Mini Cart more visible on mobile?
To ensure your mini cart is accessible on mobile devices, you can use responsive CSS. Here’s an example to make it more prominent on smaller screens:
Q2: Can I show custom product attributes (like size or color) in the mini cart?
Yes, you can display custom product attributes in the mini cart by using custom code. You can loop through the product’s attributes and display them next to the product name.
Q3: Does adding a sticky WooCommerce cart slow down my site?
While a sticky cart can improve the user experience, make sure to test the performance. If you use a plugin, ensure it is lightweight and optimized. Custom code solutions tend to have less impact on site speed.
Conclusion
Customizing the WooCommerce Mini Cart is an effective way to enhance your store’s user experience, increase conversions, and offer a more seamless shopping experience. From adding a WooCommerce sticky cart to customizing product details, there are countless ways to make your mini cart both functional and attractive.
With the tips and techniques provided in this guide, you can create a mini cart that meets the unique needs of your customers and encourages them to complete their purchases more easily.
Start implementing these changes today, and see how a customized WooCommerce Mini Cart can boost your store’s performance!


